Time to have another look at trying to get Gnome working on Ubuntu. Last time I tried to install Gnome 3, but it broke. This time I decided to install Gnome 2, but after just minutes of searching I discover Ubunut 11.04 comes shipped with 'Ubuntu Classic' mode. I felt so dumb.

Clean build of Ubuntu 11.04 'Classic' with 'New Wave' theme
So time for another 'Fresh Build' post. The following is how I've set up this machine...
Starting with the fresh install of Ubunut 11.04 running the Unity session...
- Click the Ubuntu logo in the top panel.
- In the serch dialogue, type 'login'.
- Select the 'Login Screen' icon.
- In the 'Loging Screen Settings' dialogue, select 'Unlock'.
- Where it says 'Select... as default session', change it to 'Ubuntu Classic'.
- Click 'Close'.
- Adjust any other settings you desire.
- Reboot.
The rest of this post is going to look very similar to this one for 10.04LTS.
Google Chrome web browser
I love the browser from Google, you can create an account and sync all your bookmarks. This is nice if you work across multiple computers like I do. Chromium is the open source equivalent and available from Ubuntu Software Center for click-to-install convenience. Chrome and Chromium differ in that their build streams are obviously different. I'd like to think that the consumer Chrome product 'sold' by Google is more polished and stable, but Chromium would have the latest features. Chromium also comes in multiple 'streams', depending on how bleeding edge you like to be.
Get Google Chrome - Download the appropriate DEB package (32/64bit)
Medibuntu
Adding Medibuntu to your repositories will give you a bunch of the free-to-consumer stuff that's considered non-free because it's not open source. It's not complicated, it's not gonna cost you anything and it's completely legal.
Ubuntu Community Documentation - Medibuntu
Cutting to the chase, here's what I do.
In terminal:
Add Medibuntu repository:
sudo wget --output-document=/etc/apt/sources.list.d/medibuntu.list http://www.medibuntu.org/sources.list.d/$(lsb_release -cs).list && sudo apt-get --quiet update && sudo apt-get --yes --quiet --allow-unauthenticated install medibuntu-keyring && sudo apt-get --quiet update
Make Medibuntu apps appear in the Ubuntu Software center:sudo apt-get --yes install app-install-data-medibuntu apport-hooks-medibuntu
Add the Ubuntu Restricted Extras package:sudo apt-get install ubuntu-restricted-extras
Optional extra step, purge any other flash:
sudo apt-get purge flashplugin-nonfree flashplugin-installer
For 64bit, add genuine flash for 64bit:sudo add-apt-repository ppa:sevenmachines/flash && sudo apt-get update && sudo apt-get install flashplugin64-installer
NOTE: I got this weird error saying flash was NOT installed, but after restarting, running this command again it said it was already installed. Don't ask, I don't know.OR
For 32bit, add genuine flash 32bit:
sudo apt-get install flashplugin-installer
Optional extra step, purge any other java:sudo apt-get remove -y --purge openjdk-6-jre openjdk-6-jre-lib openjdk-6-jdk gcj
Add the partner repository:sudo add-apt-repository "deb http://archive.canonical.com/ natty partner"
Update apt and install genuine java:sudo apt-get update
sudo apt-get install sun-java6-jre sun-java6-jdk sun-java6-fonts sun-java6-plugin
Make encripted DVDs work:sudo apt-get install libdvdcss2
Add mplayer and VLC for the extra codecs/formats:sudo apt-get install mplayer vlc
Add Gnome Partition Editor:sudo apt-get install gpartedRipping CDs to your PC automated
I use Asunder. It's lite and available from the software center.
You'll also need to install Lame from the software center.
I set up Asunder preferences as follows:


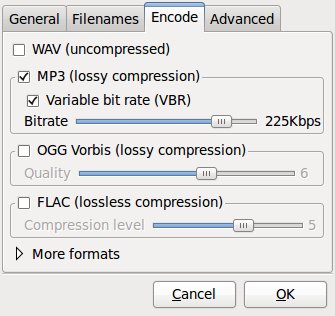

When you insert an audio disc, it will ask what app to run, select custom and simply add asunder as the command. Then each time a CD in inserted, your PC will begin to rip it to MP3, update the track info from the web and eject the disc when it's finished.
Once you have ripped your MP3s, try playing one and it will fail. Don't stress, let Ubuntu look for the gstreamer plugins, install them and you'll be sweet.
Build Essentials and Subversion
Occasionally, you will try to follow steps in walk through or resolve a problem and things won't be working for you (like compiling a driver). Build Essentials sets up your machine...
sudo apt-get install build-essential checkinstall
sudo apt-get install cvs subversion git-core mercurial
VirtualBox and WindowsVirtualBox is a really professional and free virtualisation tool that will allow you to switch on and off an alternative operating system at will. I use it to run windows for those pesky applications which don't have Linux compatible counterparts (like my Dynojet Power Commander software).
Check out my post for detailed instructions on VirtualBox.
No comments:
Post a Comment